

Lots of companies have great software products, but these products must also be demonstrated using relevant content. With all the new generative AI tools such as OpenAI on the market, we decided to test them out internally to see if they can help resolve some key issues when developing a robust demo.
The biggest problem for such a demo is finding publicly available content. Our case becomes even more interesting when we start looking at building catalogs for ecommerce demonstrations.
Follow on to see what I did.
What do you need to build a demo ecommerce catalog?
- High resolution images that are publicly available.
- Product titles, descriptions, and reviews.
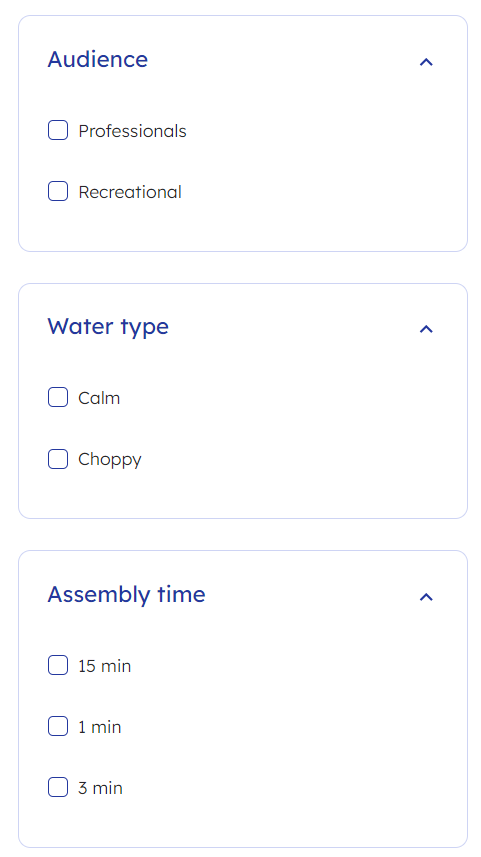
- Metadata/features, which can be used as facets and display properties.
- For example: Size, Color, Pricing.
- Attributes must match the images — very hard to do with stock photos.
- Product groupings; for example products available in a variety of colors. You’ll want to combine and display them in a single result, with the ability to cycle through the different options.
- Product variants, such as sizes and widths.
As you can read above, this is quite a challenging task. This article will explain how we did it step by step. The code is available on GITHUB.
The Process in a Nutshell
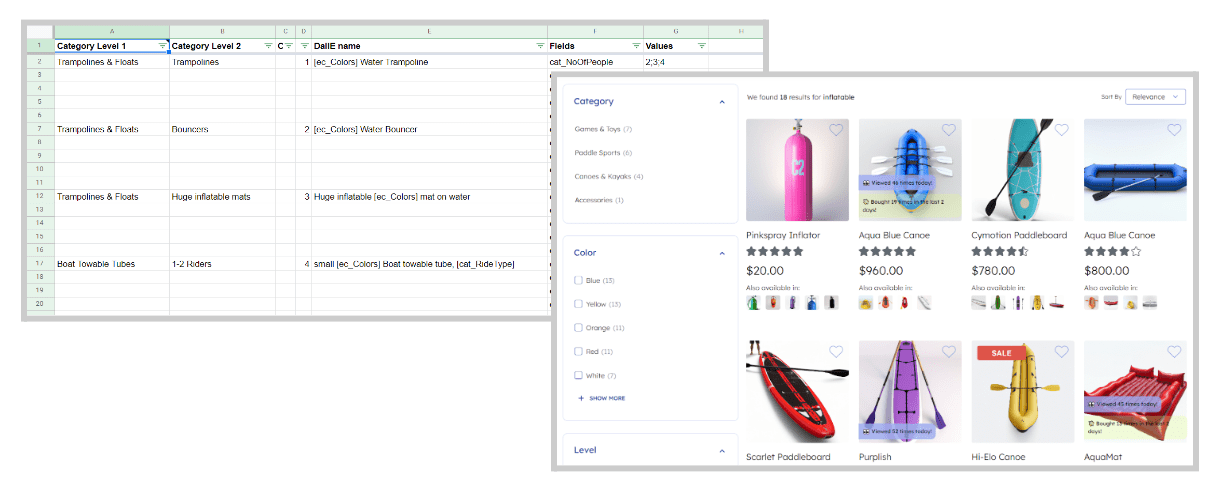
While we start with an XLS Sheet containing our taxonomy and needed fields with values…
…we end up with an ecommerce catalog demo, with names, descriptions, reviews, and images.

Follow along to see how we evolve from one to the other!

Step 1. From Nothing to a Taxonomy
To start, we need to think about our catalog. Which items should be in there; what are the categories we would like to see?
For our Barca Sports demo, we researched water sports products and created a taxonomy. We start by populating our initial taxonomy and associated metadata.
For example in the ‘Canoes & Kayaks’ category:

We also create metadata to add to our taxonomy. Creating a set of example metadata will help us to create a rich set of products. OpenAI was not accurate enough to generate example metadata for our use, so we opted to do it ourselves organically.
Our catalog also needs prices, so we estimate an average price for each item. During our catalog creation we will create random prices around that initial price.
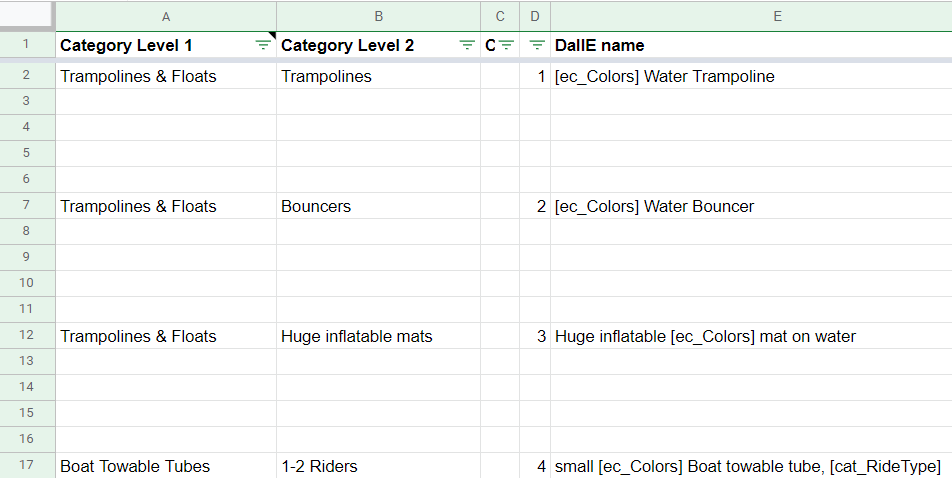
All of the categories and their metadata are put inside an XLS sheet.
Step 2. From a Taxonomy to Product Rows
Our XLS sheet now contains our taxonomy and the associated sample metadata. We first need to import the data into our parser and transform the data into product rows.
The XLS Sheet is read using the ‘pandas‘ library.
import pandas as pd
from pathlib import Path
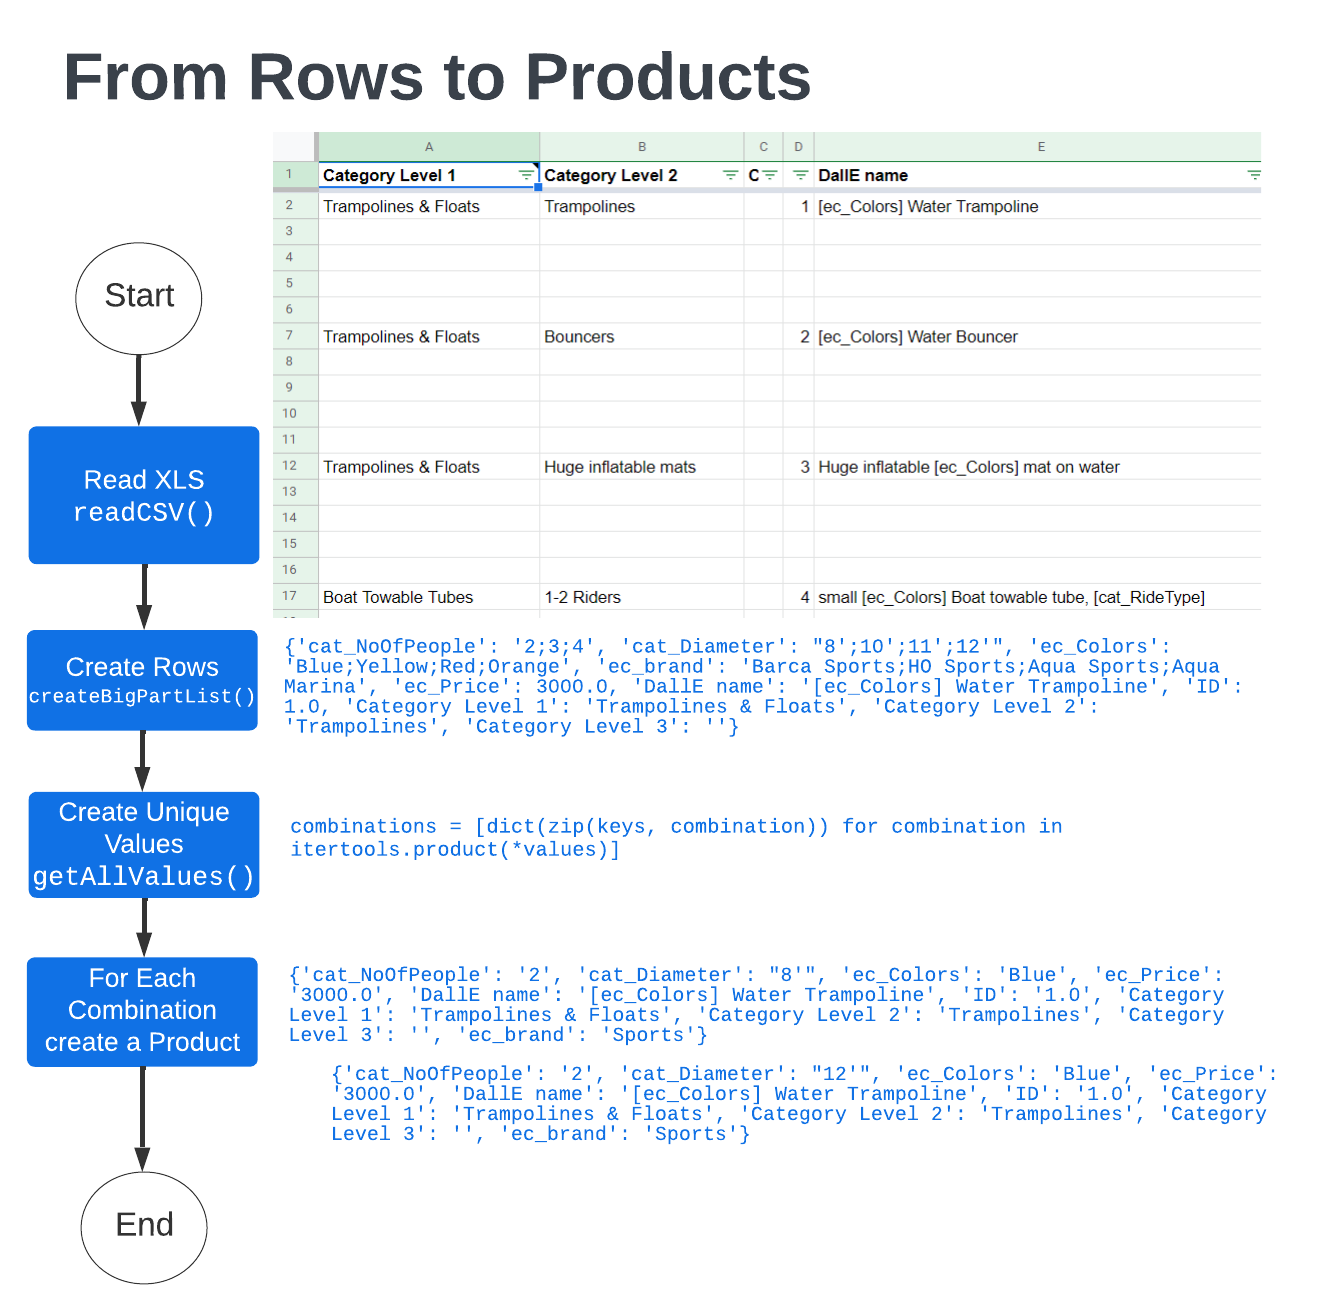
df = pd.read_excel(Path('../Barca - Brand Detail.xlsx'), sheet_name='Barca Sports Taxonomy', na_filter=False) The Excel sheet is column-based. By aggregating the values into single rows, each row has a product category with metadata:
def createBigPartsList():
  global PARTS
  PARTS = []
  currentPart = {}
  for part in ALL_PARTS:
    if (part['Fields'] == 'ec_Price'):
      # this is the last record
      currentPart[part['Fields']] = part['Values']
      currentPart['DallE name'] = part['DallE name'].strip()
      currentPart['ID'] = part['ID']
      currentPart['Category Level 1'] = part['Category Level 1'].strip()
      currentPart['Category Level 2'] = part['Category Level 2'].strip()
      currentPart['Category Level 3'] = part['Category Level 3'].strip()
      PARTS.append(json.dumps(currentPart))
      currentPart = {}
    else:
      currentPart[part['Fields']] = part['Values'];
The product object now contains all the metadata, including the ones with multiple values. Using the itertools library, we can get all the possible combinations of the metadata into single product objects.
combinations = [dict(zip(keys, combination)) for combination in itertools.product(*values)]
Step 3. Adding Images
Now that we have our taxonomy and associated metadata, we can create an initial catalog structure.
Using the Category (based on taxonomy levels) and a name to give to DALL-E mixed with the needed metadata we then can generate the needed directories for the images.
For example: \sports\images\Trampolines & Floats\Trampolines\1_Blue.

Since the generation in DALL-E is quite expensive we want to keep track of the items we already have generated. We did so by keeping a cache of the previously generated data in a JSON file.
Image Text Preparation for DALL-E
To create the right images, in our XLS sheet we included a description to use with DALL-E. DALL-E can be difficult to use with just a Category name, so we added a bit more context.
For example, we have the category Helmets, but in DALL-E we want to create: [ec_Colors] skateboard helmet
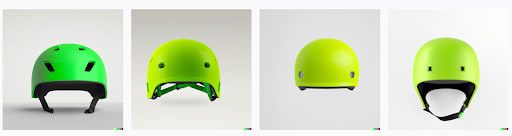
The rendering of the skateboard helmet is much better than just a ‘helmet’:
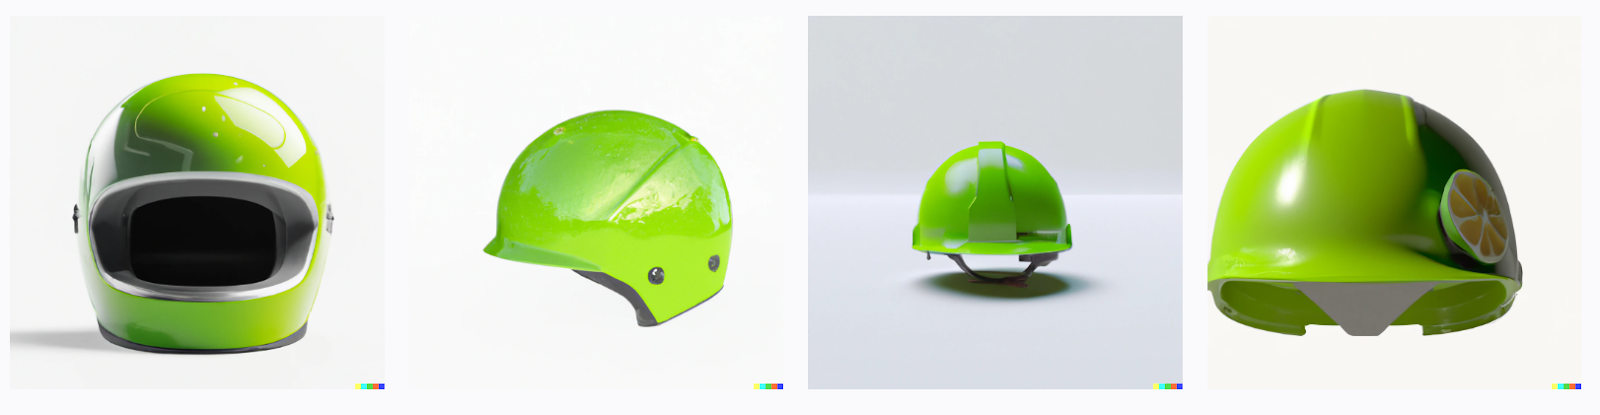
Using the metadata tags inside our text we can generate, based on the metadata values, the proper text for each category.
For each type of category we need to create images. With DALL-E this is quite a simple task.
But you need to get your syntax properly set when ‘asking’ the images from DALL-E. The biggest problem we faced was that the images are cropped or have a background which we do not want.
A few examples of the prompts we have tried:
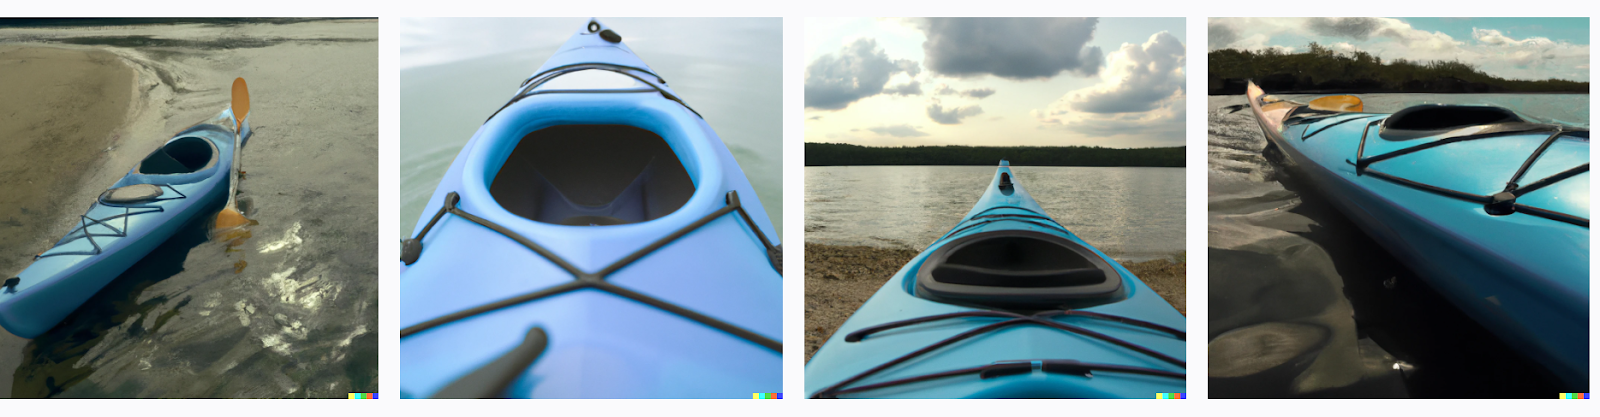
Prompt: Film still, full shot of a kayak with a blue traditional paddle, wide shot;
Not exactly what we want for a product catalog. We want the full kayak without a background.

Prompt: Film still, full shot of a blue kayak, wide shot;
Sometimes we get the full kayak, but most of the times not.
Prompt: Full body photo of a fine, accurate blue Kayak;
Looks better, no backgrounds, but still not there (images cropped by DALL-E).
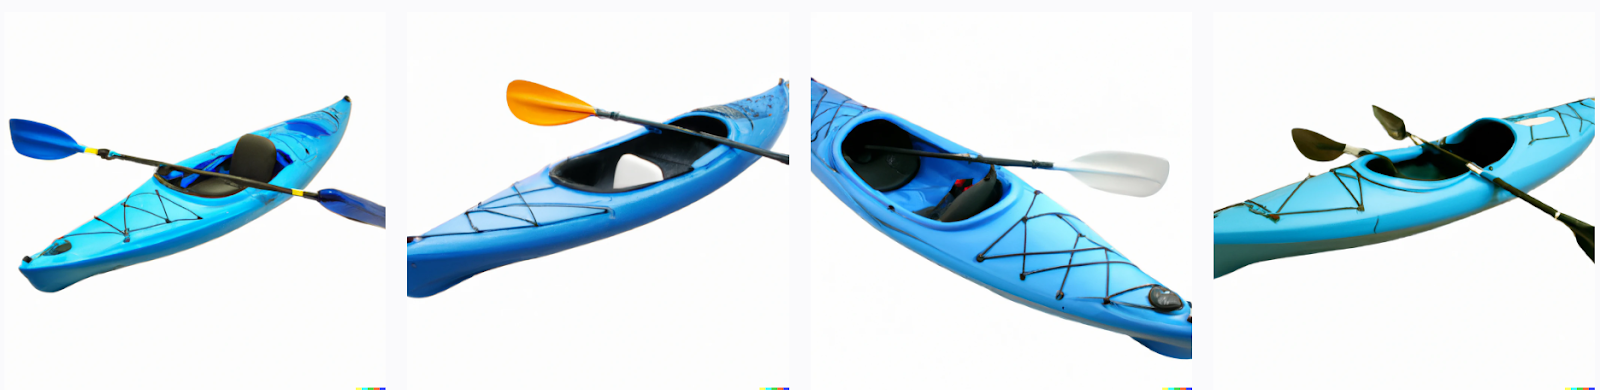
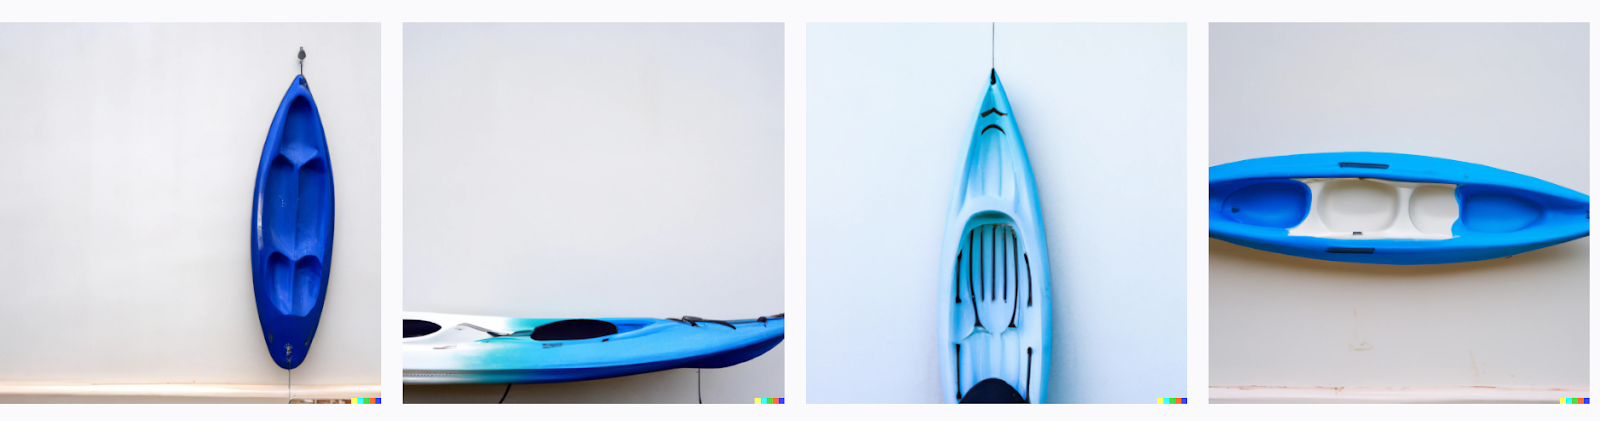
Prompt: A high quality picture containing a blue Kayak on a white wall;
Quality is improving, but a lot of images are still cropped.
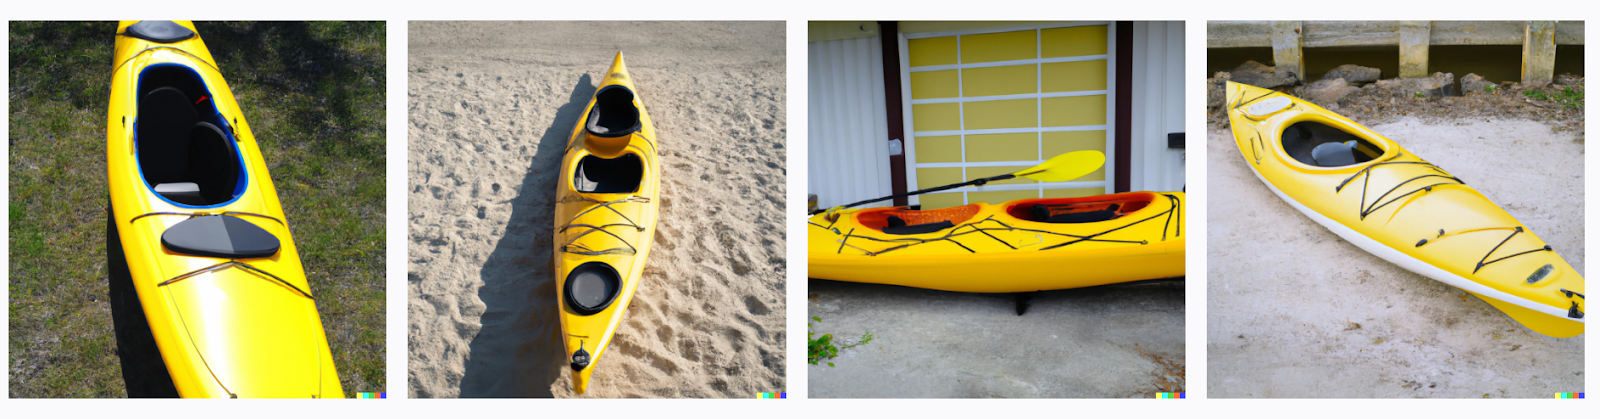
Prompt: full body picture of yellow Kayak, 4k, 24mm lens, full shot, wide shot;
Getting there, but still a lot of images where the image is cropped.
Prompt: Full body picture of red Life Jacket, 4k, 24mm lens, full shot, wide shot;
Getting better, the full shot seems to be a good candidate.

For demo purposes you do not want to have a background because it distracts the user from being focused on the product you’re offering.
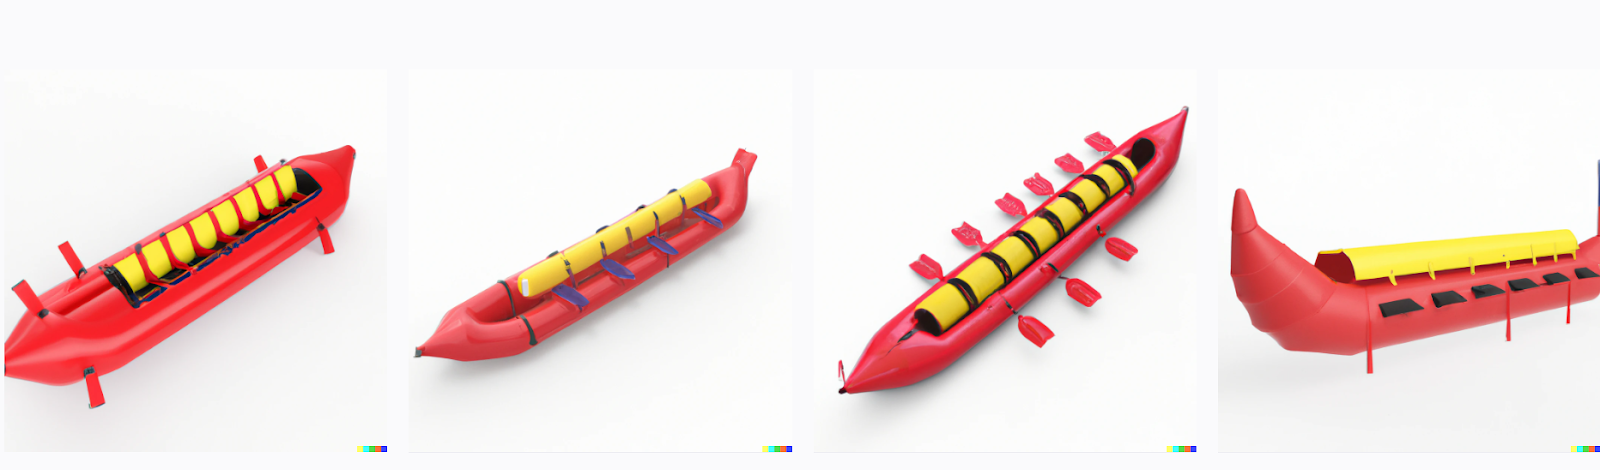
Prompt: 3d rendered red banana boat, zoomed out, in the middle, wide shot, white background, promotion, full size;
Background is gone, image cropping is getting better, almost there.
After a lot of attempts, this is the result which gave the best full, centered images:
Prompt: a photo with a [TITLE] in the middle, surrounded by a white background, vray, full shot
For example: a photo with a Purple sport water bottle in the middle, surrounded by a white background, vray, full shot

Or: a photo with a Silver Stripe Flip Flop sandals for a Women in the middle, surrounded by a white background, vray, full shot

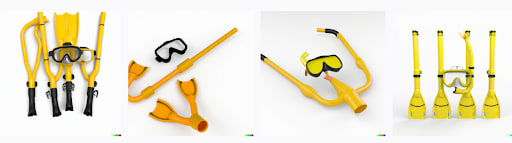
Sometimes the images created are just too funny, but not usable as a product image.
For example:
- Snorkelset
After generating the images, they were checked if they are ‘appropriate’ for our products. If not the category was removed or simply one of the generated images was removed.
For each unique product we have around four images generated. They will be assigned in a later phase to each product.
Step 4. Stitching Together the Catalog
Taxonomy is ready, images are generated. Now it’s time to create the actual product catalog.
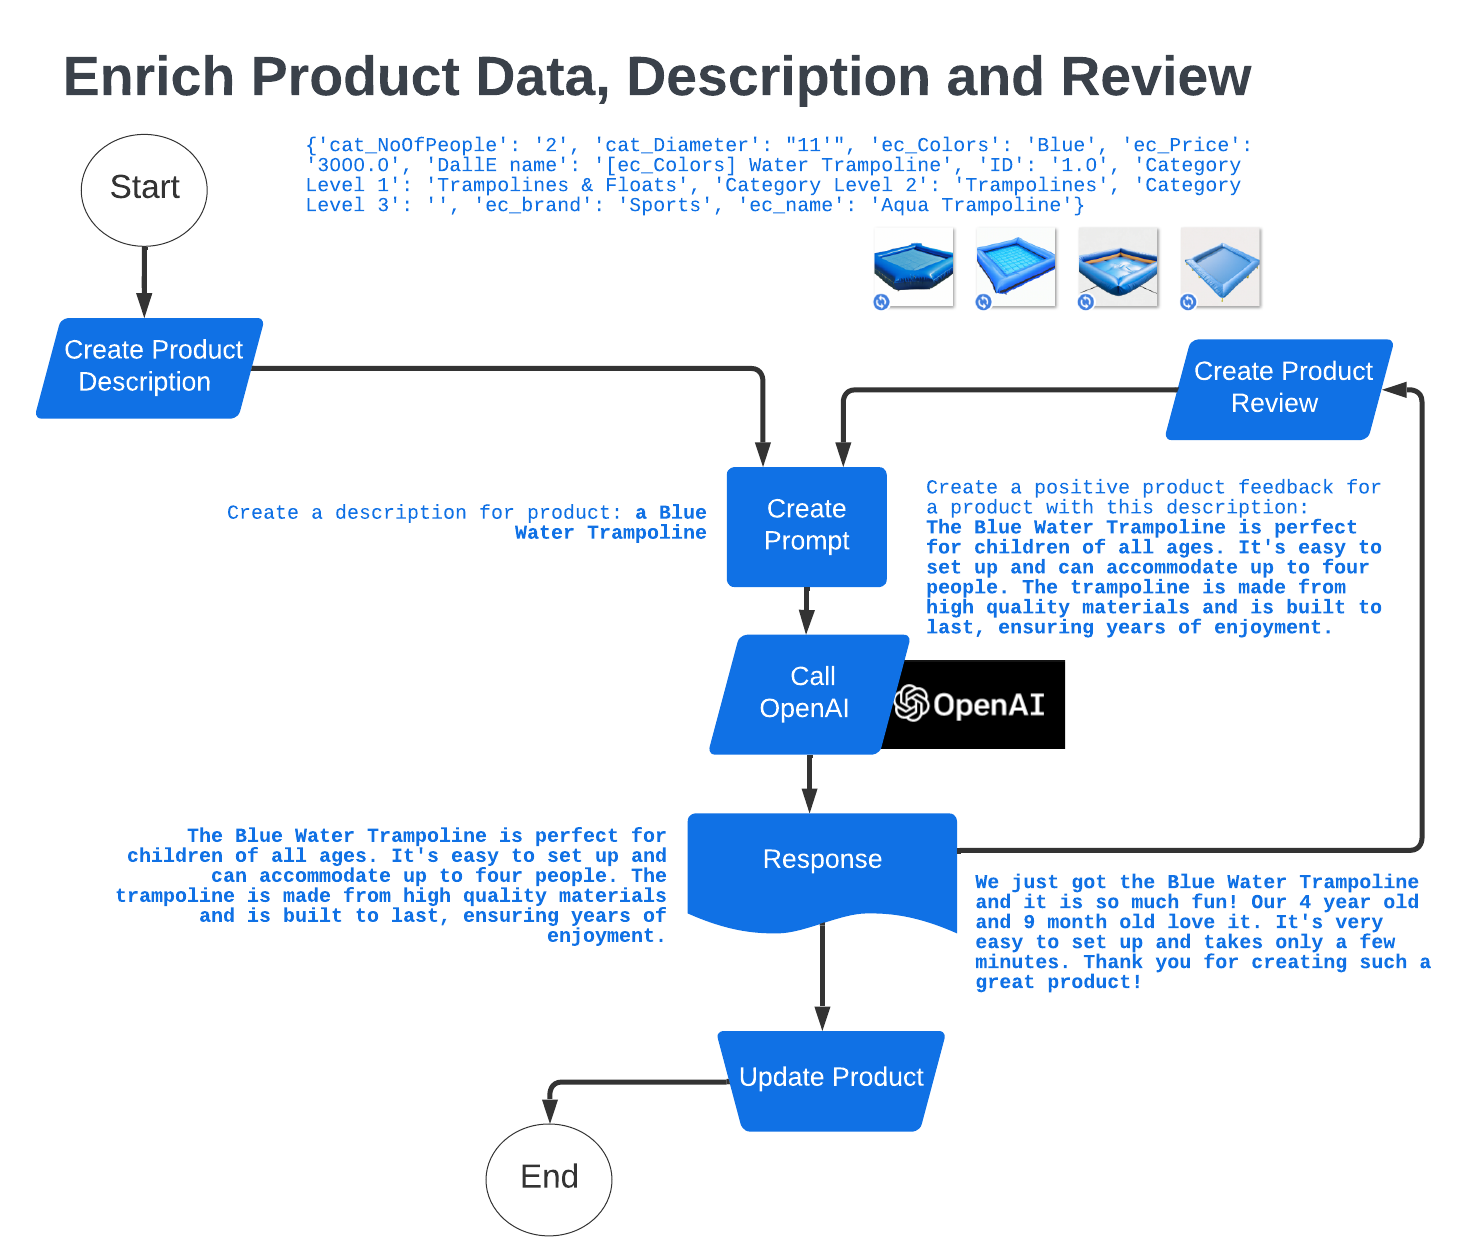
Before we can create the final product, we need metadata which does not exist yet. That is where OpenAI comes in. It can generate Branded Product Names, Descriptions and Reviews for our content.
Create Branded Product Names
We have the metadata to create the keywords we want to send to OpenAI. Using the name keywords (Blue Water Trampoline) and a prompt, we let OpenAI generate a list of branded product names. The prompt contains in this case a few examples of what kind of content we want generated.

After the generation of the branded product names, we manually check to make sure that we filter out inappropriate names (AI is not flawless).
Create Product Descriptions and Reviews
OpenAI is capable of creating a Product Description based on the same name keywords as used with the Branded Product Name generation. But this time our prompt is simpler. Now that we have a description, with that we can create a positive review text. Both metadata will be assigned to our product object.
Create Groups and Variants
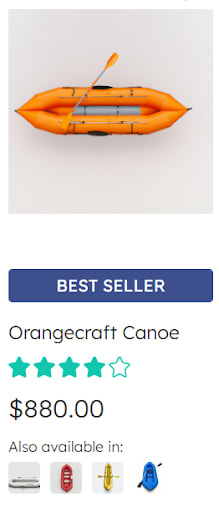
When you have a product that has different colors but otherwise the same metadata description, it’s important to show it grouped like so:
We ‘fold’ the results together based upon the same groupid. The Coveo Search API reports the results back where the children are grouped inside the childResults property. The facets represent the data in the complete result set (including the children).
Creating Product Variations
Some products have variations, meaning they are provided in different types (different Size, Diameters). While the base product is the same, each variation has their own unique SKU.
Some search vendors will suggest creating a huge index out of all possible variants by flattening the data. They merge the variant information with the product information in the index. This can quickly become unwieldy and bloat your index. For example, if you have 50,000 products, with 10 variants on five parameters each you would have 2,500,000 products in the index. If your catalog grows even more, it is almost impossible to index all of your products — let alone estimate the time to index such a huge amount of data.
Instead, Coveo stores the products and the variants in separate entities. You’d create 50,000 products and 500,000 variants in the index. It’s feasible to index more product information in a short amount of time.
To keep good track of the IDs you need to create, for grouping, products and variants, here is a good technique:
- groupid: 001, productid: 001-red, variantid (sku): 001-red-8_wide
- groupid: 026, productid: 026-blue_demo, variantid (sku): 026-blue_demo-10_slim
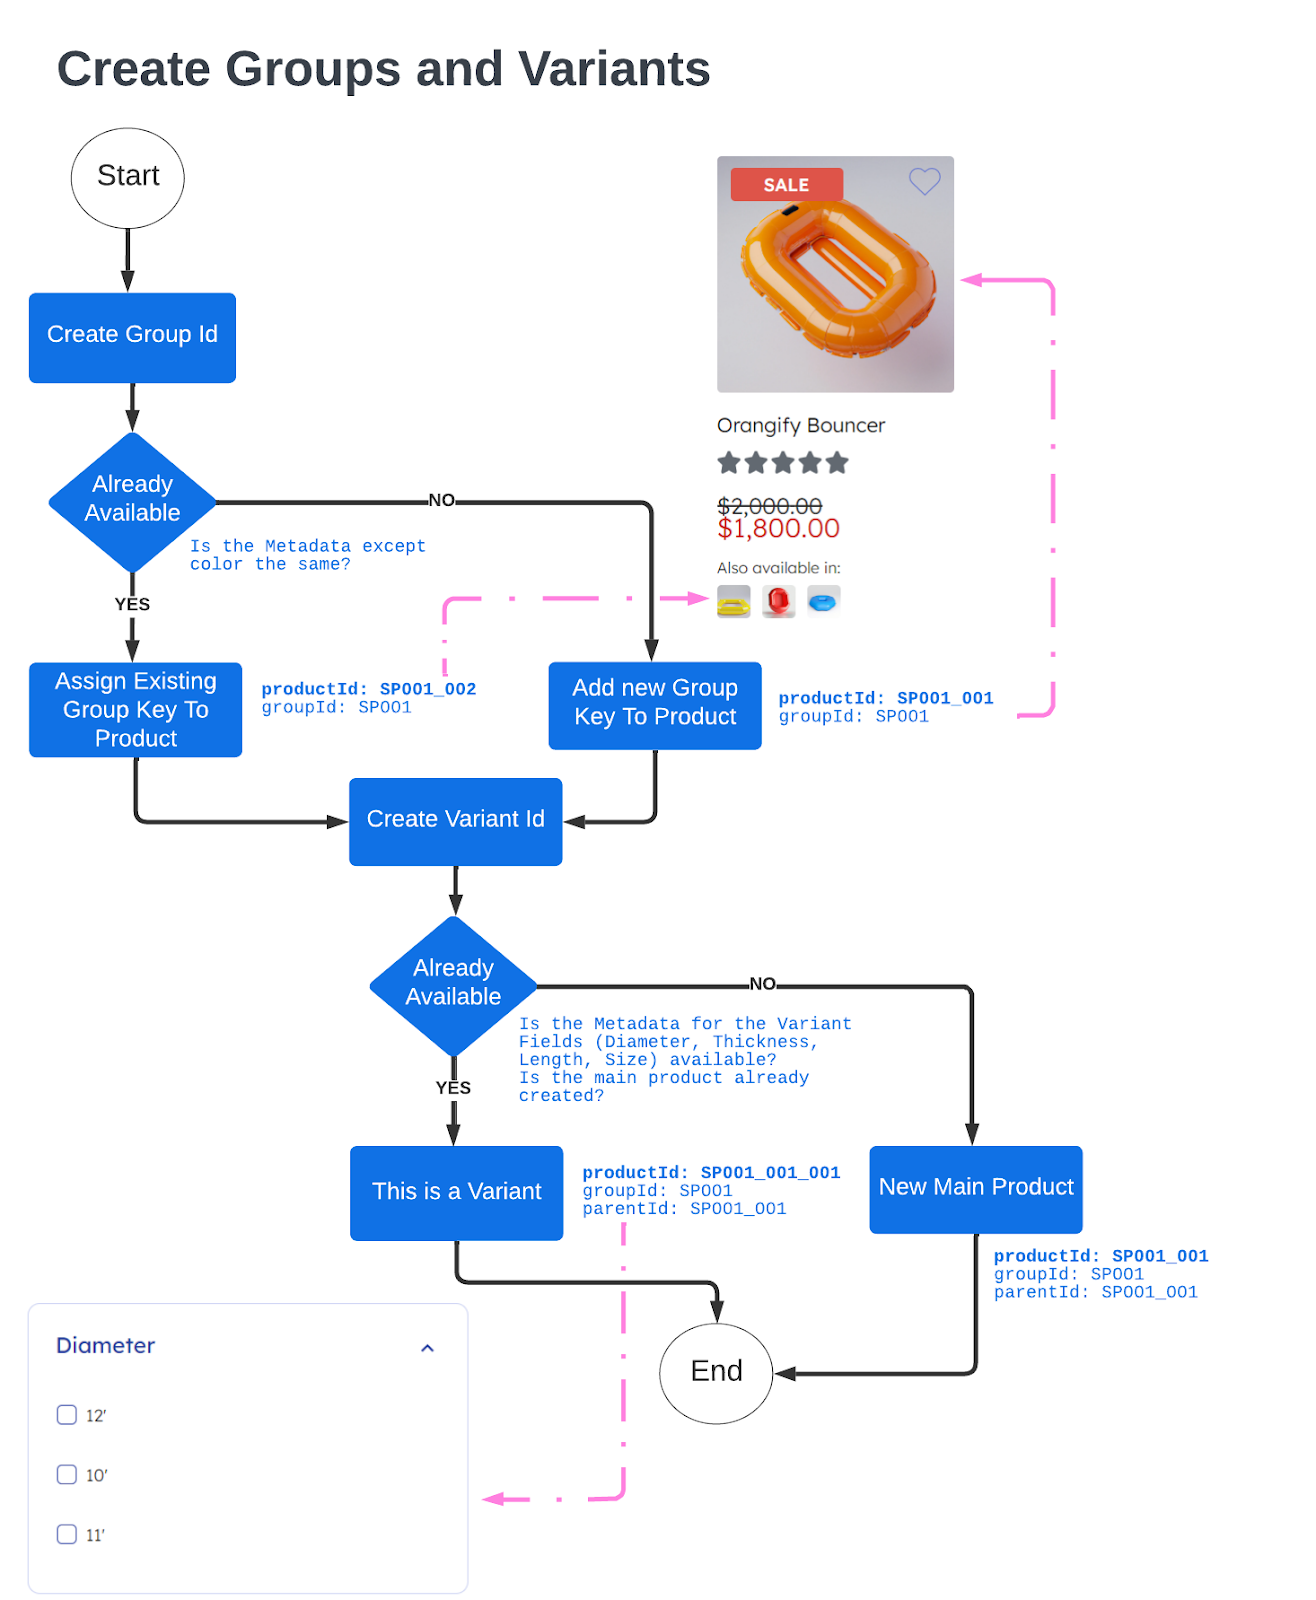
This is the process we used to create the Groups and Variants on our demo data:
We now have product data, product names and descriptions, grouping and variants. We’re ready to send the contents to our index.
Step 5. Pushing the Catalog to the Index
For our catalog the only thing which is left is generating the final content and pushing it towards the Coveo index.
In our demo we only want unique pictures. The images generated by DALL-E will be used, and if there are no more left we simply stop pushing the products for that specific category.
One other important aspect is that our Coveo Product Catalog is configured to use Variants.
Each query is generated like:
@objecttype==Product [[@ec_productid] @objecttype==Variant]
That means that the Search API expects for each product to have at least one variant available in the index. Our catalog has a few products where there are no actual variants, therefore we need to insert a few fake ones so that the Search API is still able to return them.
In Coveo you can index the content using our Stream API. The Stream API uses a Catalog source. You can read more about it in our online help.
Step 6. Build a UI
Now our content is ready and available in our index. Time to build a UI. We will use Nodejs and the Coveo Headless framework. Follow along to build a UI in this blog post.